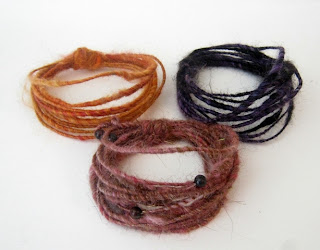
I'm having a lot of fun with a new project - spinning bracelets! Do you want to see the ones I made?
I attended the Middle Tennessee Fiber Festival a few weekends ago, and I picked up a wire core bracelet kit from Moonwood Farm. It looked like this:
It contained three mini batts (gorgeous, luxurious Roo batts!), a spool of jewelry wire and a strand of beads. I could hardly wait to get these babies on my wheel!
Here's how to spin your own, if you're so inclined!
1. Pick up a bracelet spinning kit like mine from Moonwood Farm. (Note: I see she doesn't have any in stock but I'm sure she could put one together for you if you ask her nicely.) OR make your own by just acquiring some jewelry wire, mini batts and beads (the beads are entirely optional).
2. Start spinning one of the batts on your wheel as a relatively thin single. Spin for a few inches.
3. Bend the end of the wire over onto itself to protect you from the sharp, cut end. Insert the wire into the middle of the fiber you're about to spin as if you were going to core-spin it (which you are).
3. Core-spin around the wire. Helpful Hint: When I first got the fiber turning around the wire and got the wire itself to spin, it took a lot of work and the stuff I had already spun got pretty over-twisted, but that's okay; it all works out in the end.
4. Continue to core-spin around the wire and wrap the wire onto your bobbin as you go. Mine just wound right on there, but you may have to pause and help it along with your hands.
5. When you're almost out of fiber, cut the wire. I just used scissors because my wire was fairly thin/pliable. Bend the cut in over onto the main body of the wire as you did at the beginning.
6. Continue to spin the fiber itself as a single until you run out.
7. Unwind the bracelet from your bobbin. Coil it around itself to make it large enough to easily slide onto your wrist without being so large as to fall off. You can leave it like that if you wish, and it will be an open coil bracelet. In that case, use a little hot water on the ends and rub them with your fingers to wrap the fiber-only strands around the ends of the wire to keep the wire hidden. Option B here is to do what I did - wrap the fiber-only ends around all of the coils to secure them together, then wet felt with your fingers and hot water to secure the connection (see my photo above to see how that looks).
8. Wear your bracelet or give them as gifts! These are SUPER fast - maybe 10 to 15 minutes of time per bracelet. I plan to make several and hold onto them for future swaps and holidays!
Optional Beads (as in the pink one in the top photo):
If your bracelet is thin enough and your beads are large enough, you can probably string them on after spinning. In my case the wool was too thick for these beads, so I strung them onto the wire itself before spinning. Then I'd core-spin for a while and pause, pulling up a bead. I'd sort of core-spin the fiber around the bead to hold it in place on the wire and then keep going. This is a fun way to add a little extra bling to your bracelets!
Tips:
- Use wool-blend fibers so you can felt the ends when you're finished.
- In my experience this worked really well with super smooth mini batts (approx. 1/4 ounce per bracelet). I'm not sure the same would be true with chunky art batts, which might not secure themselves around the wire as easily, but it might be worth a try!
Welcome to the home of Storied Yarns: Fiber Arts with Character! This blog is the place where I will share updates about my fiber arts pursuits and tell the stories of my creative journeys in life. I hope you'll share your stories with me, too!
Crafty Stories
I like to tell stories through the creative arts. I may be slightly obsessed with books, movies, TV shows, yarn and fiber. Wanna hang out?
Subscribe to:
Post Comments (Atom)


Thanks so much for these instructions! I'm a somewhat novice spinner, but I've been wanting to try this since last fall. These are the best instructions I've seen anywhere. :)
ReplyDelete