Crafty Stories

I like to tell stories through the creative arts. I may be slightly obsessed with books, movies, TV shows, yarn and fiber. Wanna hang out?

Friday, September 30, 2011

Fiber Arts Friday: Knitting and Crocheting with Handspun Yarn

Happy Fiber Arts Friday! It's my favorite day of the week because I get to remind myself to sit down and write about something fibery and amazing. :)

Recently I've been knitting and crocheting with a lot of handspun yarn. Truth be told, I rarely use commercial yarns at all any more. There's absolutely nothing wrong with them, it's just that I enjoy using handspun so much that I don't get around to the non-handspun projects as frequently.

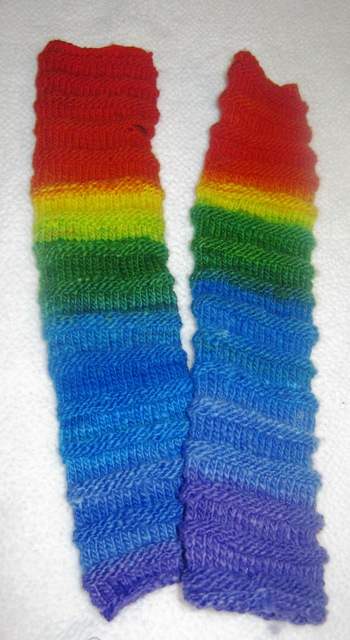
Awesome arm warmers I knit with gifted handspun.


I've been trying to figure out what it is that I find so amazing about knitting or crocheting with handspun. I think it comes down to the idea of the knitting and crocheting as an art form. When you knit or crochet, you put a little bit of yourself into the project; you weave your energy and emotion into every stitch (at least, I think you do). When you spin a yarn, I feel that you do the same thing. You create beauty and art with every yard you spin. So knitting with yarn that was created by an artist only adds to the beauty and wonder of the finished item.

Citron I knit for my grandmother using 2 handspun skeins.


Even if you feel like your handspun isn't "good enough," or you wouldn't ever consider yourself an artist just because you spin yarn or knit, let me tell you: it IS good enough - more than good enough! - and you ARE an artist. You are creating a little bit more beauty in the world every time you spin a yarn or knit/crochet an item, and I think that's amazing. If that's not art, I don't know what is.

Anyway, I know people who are knitters/crocheters who have never knit with handspun before. I used to be one of them! And I think that's sad. :( I feel like if everyone could knit or crochet just ONE thing with handspun, they'd be hooked for life! Sometimes I think people are just not sure what to do with handspun, either because the texture is so different from commercial yarns, or the yardage is low, or it seems "too pretty to mess up," or whatever. I'm here to tell you to just put all those doubts aside, pick up a skein and start knitting!

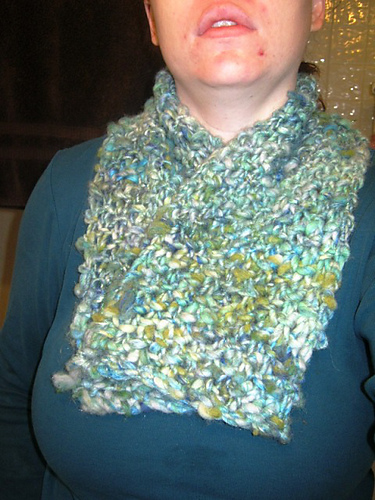
Neck Warmer I knit with only about 40-50 yards of bulky corespun.


Here are some tips for knitting with handspun yarn:
- Let the yarn determine the finished product. I believe handspun will "speak" to you and tell you what it wants to be. It may not happen right away, but eventually that right project will come along for every skein.
- Keep your stitches simple if the handspun yarn has a lot going on. Art yarns, in particular, look fabulous in a simple garter or stockinette stitch pattern because then the yarn gets to be the star of the show in the finished garment.
- Don't be afraid of thick and thin textures, add-ins or artsy effects. Just start knitting! These qualities will enhance the texture of your finished project and make it look amazing.
- If the yardage is low, never fear! Use a larger set of needles and an open stitch pattern and you'll get a lot further with that skein than you ever thought possible.

Here are some examples of things I knit with handspun yarn:

I knit this baby hat just recently, using a skein of single-ply thick n' thin (exaggerated, with some fairly thin parts and some big floofy parts) yarn. It was only a 2-oz skein to begin with, and it was over-twisted in parts. See?


I didn't let that worry me, though! I used a top-down pattern formula for a pixie hat (in case you run out of yarn, that way you can add a different yarn to the brim instead of the crown) and size 10.5 DPNs and went for it. I love the result:


I also had a gorgeous skein of corespun yarn in my stash. I got it in the handspun swap from Julieeeeee (Ravelry ID), and I fell in love with it! In this photo it's the skein on the far left. (Remember this photo, we'll be back to it later.)


I really wanted all that color and texture to show through in the finished project, so I knit it into a big, soft cowl. I just cast on until I figured it was wide/long enough for my liking, and I kept knitting until I had just enough yarn left for the bind-off. I used a plain stockinette stitch for the body with a few rounds of garter stitch at the beginning and ending, and I love it!


Using that same photo above, I crocheted the giant chunky skein in the middle into this hat - I only had 58 yards or so to begin with, and I got one heck of a hat out of it using a size US N hook:


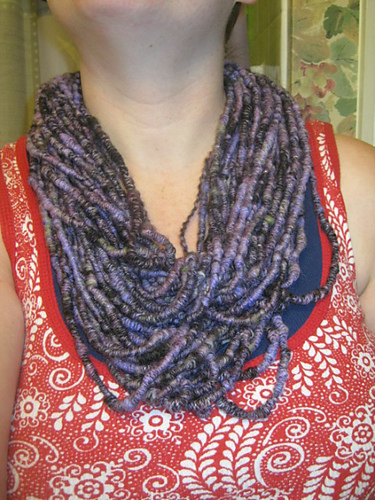
Sometimes you just love the yarn so much you want to display it as it is. I did that recently, too! Go back to that photo above and check out the awesome skein of purple super-coiled handspun. It's a work of art in and of itself. I immediately draped it around my neck when I got it, and I loved how it looked that way so I wrapped a little yarn around one section to secure it and voila! I had a new accessory:


Anyway, I could go on and on, but you have things to do today I'm sure! I hope I've shown at least one person that knitting and crocheting with handspun is an adventure all to itself. As a special bonus, I'm offering a sale on the handspun sections in my Etsy and Artfire shops! Use code handspunisfun to save 20% off handspun yarns for one week only!

While you're at it, tomorrow is the last day to sign up for my Trick or Treat SAL/KAL! More information can be found in this blog post.

Thank you for visiting my little corner of the world! Head on over to Wonder Why Gal's blog and check out the rest of the Fiber Arts Friday fun!

Wednesday, September 28, 2011

An Interview with Lady Liberty

Guess what? I'm famous - in my own mind at least, haha! I was interviewed by the lovely Liberty of Liberty's Yarn.

Head on over to Liberty's blog and check out the interview!

Tuesday, September 27, 2011

Decorate for Fall: Handmade Garland Ideas

So, I should probably confess that I may be slightly addicted to garland. I don't know what it is about garland that I love so much, though I guess it might be that it's so simple and easy to make and yet makes your home feel automatically more festive when you hang it up.

This fall I plan to add to the garland collection I already own in order to really pretty up my house for the various upcoming holidays. Won't you join me in my garland-making adventures?

Last year I made this garland:


Here is a close-up shot of one leaf and one pumpkin:


I used all my own handspun to make the garland and then strung it on some commercial brown cotton yarn. I used the crochet leaf pattern from Crochet Memories and the knitted pumpkin pattern from Natural Suburbia. I love this garland and it fits perfectly over a doorway in my dining room. This year I may add some more to it, maybe some silk flowers and leaves, to fill it out a little.

Today I came across this crochet lacy leaf garland from Goodknits. Um, yes please! I love it. Lucky for me I have a big window in the front of my living room with a wooden cornice over it which is perfect for displaying garland. I'll be diving through my stash today to find some more handspun and possibly fiber to spin in fall colors so I can make this garland soon!

Stay tuned to this blog for more ideas to decorate your home with a handmade and frugal flair this fall and winter holiday season!

Friday, September 23, 2011

Fiber Arts Friday: Blog-Warming Party

Hi there, and welcome to my new blog! I had a lot of fun blogging at my old location, but it was time for a change and some positive moves in a new direction. So, here I am!

In celebration of Fiber Arts Friday, allow me to welcome you to my little corner of the blogosphere! Here at the new Storied Yarns blog you will find updates on my Etsy shop, new colorways, progress on my knitting and crocheting and spinning projects, and other crafty tutorials and fun. Check out the side bar - you'll find links to my free knitting patterns, free crochet patterns and my Storied Yarns shop.

While you're thinking about my Etsy shop, I want to invite you to join me and some of my friends in spinning and knitting to celebrate Halloween this year! I'm hosting a Trick-or-Treat Spin-Along and Knit-Along.


You can read more about it in my last blog post or in my Ravelry group. Then head over to the shop and purchase your listing for roving or batts or yarn! I will dye up a Halloween colorway inspired by your favorite things about the holiday and send it to you along with other fun seasonal goodies. Then you can spin or knit up the contents of your package and post in the Ravelry group to enter to win prizes!

As an extra special "thank you" for visiting my new blog, use the code Blogwarming to earn 15% off in my Etsy shop! This code will be good for ONE week only and will work on anything in the shop, including this SAL/KAL, my fiber and yarn clubs and any in-stock or custom order listings!

Happy Fiber Arts Friday, everyone! I hope you'll add my new blog to all of your blog readers, RSS feeds and e-mail lists so you can join me on my crafty adventures from now on! When you're finished with all of that, visit Andrea's blog and say hello to the rest of the Fiber Arts Friday participants!

Thursday, September 22, 2011

Halloween SAL/KAL Packages Available Now!

Trick or Treat!

I'm having a Halloween themed Spin-Along and Knit-Along! Come join in on the fun!


Purchase your package now in my Storied Yarns Etsy Shop. Choose from yarn, batts and roving options!

With this listing, you will receive:
- One full-sized yarn or fiber item (yarn, roving or batts) dyed to match your choice of Halloween inspiration.
- Extra Halloween themed goodies from me!

After purchase, come on over to my Storied Yarns Ravelry group and share what you receive in your package. Spin your fiber or knit with your yarn and enter in the group to win a special Halloween goodie package!

After all the work you're doing to make the holidays special for other people, isn't it time you gave YOURSELF a Halloween treat?

Tuesday, September 20, 2011

Free Knitting Pattern: Reversible Fingerless Gloves

Thanks for checking out my tutorial for knitting fingerless mitts! Some people call them arm warmers, wrist warmers or even gauntlets; whatever you call them, I love them, so I make them a LOT. This is one pattern that I really enjoy because it's simple enough to show off a really awesome skein of yarn, and it's cozy and textural all at the same time. I would say the pattern is good for an adventurous beginner; if you're able to work in the round and you're not afraid to change something here and there to make a pattern work for you, then dig in! Find this pattern on Ravelry here.

This is a free pattern for knitting fingerless gloves, so it hasn't been fully tested. If you find a problem or have a question about the pattern, please feel free to leave it as a comment on this post.

I don't care what you do with the items you knit from this pattern; please feel free to knit these mitts for yourself or friends, or sell the finished mitts however you please. I only ask that you give me credit for the pattern if you sell the mitts online and that you link back to this pattern instead of re-posting or publishing it elsewhere. Also, please don't try to sell this pattern as your own.

Here's a shot of my adorable daughter modeling these mitts. Please note that they fit me, at 31, and they also fit her at 6. So there's a double bonus for you! :)

 Materials:
I designed this pattern for handspun yarn because I love handspun yarn and in my humble opinion the world can never have too many free knitting patterns for handspun yarns. This doesn't mean you have to USE handspun yarn for this pattern, though, so just bear with me here.
For Handspun Users:
The yarn I used for my sample (rainbow) mitts is yarn that I spun myself from Australian Merino. I had a 4-ounce braid of the fiber, and I divided that braid lengthwise into two strips. I spun each strip as an individual single, from red to purple, and then I wound those singles into balls and knit them into my mitts. My singles were approximately sport weight, but your single gauge doesn't really matter as long as you choose needles that will coordinate with the yarn you use.
For Commercial Yarn Users:
I used sport-weight yarn for this project, give or take. If you want to follow my instructions exactly, you should use sport weight yarn, too. If not, read the section on gauge and figure out how to make this pattern work for the yarn you want to use. You will have to change the size of the needles you use and the number of stitches you cast on if you do this, but that's okay! Good knitters improvise all the time.
Other Materials:
You'll need to knit this project in the round, so use your favorite method for that. I used DPNs (double pointed needles), but you can do magic loop if you prefer. Choose needles that will keep your stitches relatively close together; in other words, whatever is recommended for that weight, give or take a size or two. For my sport weight yarn I used size US 6 DPNs.


Above is an image of the yarn I spun for this project. These mitts look particularly great in self-striping or graduated colors.

Gauge:
I don't love knitting gauge swatches. But I also don't love ripping out a project halfway through because it's too big or too small. I leave it up to you to decide the to-gauge-or-not-to-gauge question for yourself, but here are my suggestions for it.
For my own mitts, I got 6 stitches per inch for my horizontal gauge; vertical gauge is entirely unimportant here, but in case you care I got about 7 to 8 rounds in one inch.
Cast on a few stitches in the yarn you want to use and knit in stockinette stitch for a while to see if your gauge matches mine. I knit my mitts to fit my arms; the widest part of my hand measures about 3.5 inches across (this is just across my knuckles). If your hand is a lot different than mine then you'll need to add or take away from your cast-on count to accommodate that.
Before you knit these mitts, take whatever yarn you're using and divide it in half. If you spun it yourself this is easy, because you already have two skeins; use the shorter skein to knit your first mitt so you know for sure you can knit the second mitt to match it. If you're using a full-sized skein of commercial yarn or handspun, divide it in half so you have two equal balls of yarn, one per mitt.

A Note on Pattern Construction:
I designed this pattern to be worked from the top down, so that way you can make the thumb hole early on and just keep knitting the body of the mitts until you run out of yarn or they are as long as you want. Since you divide the yarn in half before you start, you will be able to accomplish this without saving the yarn for the second mitt.
I wear these mitts pushed up toward my wrist slightly. Because of this, I was able to knit one big tube with the same circumference from my palm to my forearm. However, if I wanted to pull these mitts toward my elbow they'd be a little tight. Keep that in mind as you knit; if you want to stretch out your mitts then you should make them a little shorter so they'll "land" on your arm before the widest part.
Otherwise, a more experienced knitter could just add a few increases to the last section or two and make them wider at the base than they are at the start. If you're worried about not BEING that type of experienced knitter, just push up your mitts like I do with mine; trust me, they look awesome that way.
You may notice these don't have a formal thumb gusset. I designed them that way for two reasons: one, I find a thumb gusset to be unnecessary, as long as there's a hole; two, I didn't want the thumb gusset to be knit in a different color than the section it's in, and it would have been tricky to hold out some yarn to go back and pick up the gusset and knit it later. So I skipped it, taking the easy way out. If you want a thumb gusset on your mitts, you'll either need to reserve yarn to knit it after the fact or you'll have to knit it in the yarn you have left over at the end of your project.

Pattern Instructions (Finally, right?):
Cast on 40 stitches using your preferred method.
Join to work in the round, placing a marker at the start of the round if you need it. (I didn't, I just remember by the placement of my yarn tail.)
Rounds 1 through 5: Knit all.
Rounds 6 through 8: Purl all.
Rounds 9 through 15: Knit all.
Repeat rounds 6 through 15 two more times. This is where I paused to make my thumb hole; if your mitts look like they're too short, repeat 6 through 15 as many more times as you want in order to get the height you want for the top of your mitts. When you're ready, keep going with the pattern.
Thumb Hole Round 1: Bind off 8 stitches in purl; purl the remaining stitches in the round (if your gauge is different than mine, just eye-ball it to figure out how many stitches across you need to bind off to fit your thumb in there).
Thumb Hole Round 2: Cast on 8 stitches on the right-side needle using the backward loop method. Purl remaining stitches in the round.
Thumb Hole Round 3: Purl all.
From here on out you are going to knit your mitts in the following fashion: Knit all stitches in the round for 7 rounds, Purl all stitches in the round for 3 rounds.
Continue in this fashion until you are almost out of yarn in your first skein. For your last rounds, knit 5 rounds and then bind off all stitches.
For my mitts, I knit a total of 17 knit sections and 16 purl sections. You may have more or fewer depending on how much yarn you've got and how long or short you want your mitts to end up.
Repeat this pattern once more to make the second mitt. Wear them this side out or turn them the other way for a different look!

Here are some more shots of the mitts I knitted:

Happy Stitching!