Crafty Stories

I like to tell stories through the creative arts. I may be slightly obsessed with books, movies, TV shows, yarn and fiber. Wanna hang out?

Friday, December 30, 2011

Fiber Arts Friday: FREE Baby Ear Flap Hat Crochet Pattern

Happy Fiber Arts Friday, everyone!

The year may be almost over, but I'm still really busy - how did that happen? Oh well, it's a good kind of busy! I've been updating the Storied Yarns Shop with exciting goodies like small and large yarn/fiber surprise packages, new batts and yarns and rovings! The sale section is full of great deals for year-end fiber stocking, too. I've also added listings for an awesome sweater knit/crochet-along. We'd love for you to join us on Ravelry to knit or crochet a sweater in the New Year!

Today for Fiber Arts Friday I thought I'd move another of my previously-published patterns to its new home here on the blog. As with all of my patterns, feel free to use this for your personal use or to make gifts or even make hats to sell. Please just do not sell, distribute or copy the pattern itself. Thank you!

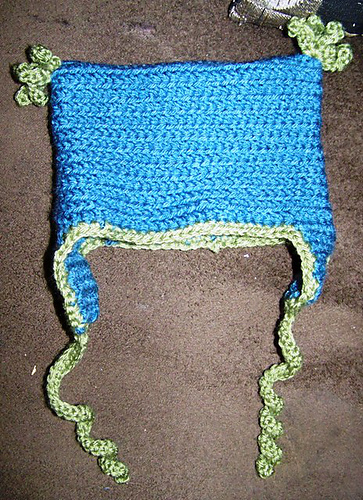
Cover Those Ears: Baby Ear Flap Hat
by Jessica Cook

Materials and Abbreviations
To crochet this hat you will need:
  • Crochet hook size US G
  • Worsted weight yarn in two colors
  • Two safety pins or removeable stitch markers
Abbreviations used in this pattern:
  • ch = chain
  • sl st = slip stitch
  • hdc = half double crochet (US terminology)
  • BLO = crochet in the back loops only of these stitches
  • sts = stitches
  • hdc2tog = half double crochet two stitches together; makes one decrease

Directions for the Hat Body
NOTE: This hat fit my son when he was a newborn. For a larger hat, increase the size of your starting chain and add rounds after round 13.
Using Main Color, Ch 60. Join with a sl st to form a circle, being careful not to twist the chain.
Round 1: Ch 2, hdc in 2nd ch from hook and every ch around. Join with a sl st.
R2 – R13: Ch 1, hdc in BLO of every st around. Join w/ sl st to beg. Ch-2. Fasten off.
Turn the hat inside out, fold it flat and whipstitch the starting chain edge together to make a flat top. Fold the hat right side out again.

Directions for the Ear Flaps
Hold the hat so that the back seam is in front of you and the open end of the hat is facing up. Fold the hat flat and find the end stitch on either side of the fold. Put a safety pin or removeable stitch marker in each of these stitches.
R1: Open up the hat and count four stitches to the right of one of your safety pinned stitches (to the right as you are looking at the hat with the open end up). Join your Main Color yarn in this stitch, chain one, and make 9 hdc sts across; the 5th stitch you make will be in the stitch holding the marker or safety pin. Remove your marker or safety pin as you go.
R2-R4: Ch 2, hdc in each hdc across.
R5: Ch 1, hdc2tog across 1st 2 sts, 5 hdc, hdc2tog over last 2 sts.
R6: Ch 2, hdc in each hdc across.
R7: Ch 1, hdc2tog across 1st 2 sts, 3 hdc, hdc2tog over last 2 sts. Fasten off. Repeat on opposite side of the hat for the 2nd ear flap.

Finishing
Contrast Edging.
Join contrasting color yarn with a sl st. on the back of the hat. Ch 1 and sc all the way around the edge of the hat, including around each ear flap. When you get to the center st on the bottom edge of the ear flap, ch 36 for a tie closure, then make 35 sc back down the ch sts and continue to sc around the ear flap and the front of the hat. Repeat this for the other ear flap as well and continue around the back of the hat. Join with a sl st. into your first sc.
Toppers.
Join CC yarn with a sl st to one top corner of the hat. Ch 6, then sc in the 2nd ch from hook and each ch back toward the hat. Sl st to the hat itself. Repeat this until you have made a total of 5 sc toppers. Fasten off and repeat on the opposite corner of the hat.
Weave in all loose ends using a large eye blunt needle.

 I hope you enjoyed the pattern! Now head on over to Andrea's Blog for the rest of Fiber Arts Friday!

Wednesday, December 28, 2011

FREE Crochet Pattern: Puff Stitch Wristwarmers

Here's another of my patterns that I published on another site in the past, and now it is moving to its permanent home here on the blog.

Enjoy!

Puff Stitch Wristwarmers
by Jessica Cook


Pattern Inspiration
Last year I crocheted a slouchy hat pattern as a gift for my son's teacher. I wanted to round out the gift a little more, so I whipped up a set of wristwarmers to coordinate with the puff stitch pattern in the hat. This pattern is the result of that moment of inspiration.
I should warn you of a few things before you jump right on into crocheting this pattern:
  1. I am not a professional crochet designer, though I like to think my patterns are easy to understand. If you have any trouble with this pattern you can PLEASE send me a message here or on Ravelry.com (I'm Jessecreations there).
  2. I wrote this pattern based on the single pair of these mitts I have made. I made them to fit my hands, which I think are pretty average, but they may not fit your hands. If you find that you crochet the first few rows and these are too big or too small, you may have to adjust the pattern to suit your needs.
  3. This pattern is untested. Crochet at your own risk. 
Materials, Notes and Abbreviations

Here's what I used to make these mitts for myself:
  • Worsted weight yarn. It was Hobby Lobby's "I Love This Yarn!" in a solid light grey color. This is close to an Aran weight, really. Feel free to substitute other yarns, just know that it might change the pattern slightly.
  • Crochet hook, size US H.
  • Large eye blunt needle for weaving in ends.
If you find the pattern doesn't fit you as it is written, consider using a thicker or thinner yarn combined with a larger or smaller hook to make it work. That way you can still follow the pattern without altering it but you don't have to make fingerless mitts that don't fit.

Some notes about the pattern:
  • When you get to round 10, you will start working the thumb hole. You leave a few sts unworked and turn your work instead of crocheting in the round. Then you will re-join your work later, creating a small gap for your thumb.
Stitch abbreviations used in the pattern:
  • CH = chain
  • Sts = stitches
  • DC = double crochet (American terminology)
  • SC = single crochet (American terminology)
  • Sl st = slip stitch
  • Puff st = (YO, insert hook in next st, YO, pull up a loop) 4 times, YO, and draw through all loops on hook.
Pattern Instructions for First Mitt
This pattern contains directions for crocheting each mitt separately, so please pay attention to that. You will need to know how to crochet in the round in order to make this pattern work for you.
Using your H hook and your worsted/aran weight yarn:
Ch 26.
Round 1: DC in 4th ch from the hook and each ch across. Join with a slip stitch. (Note: This makes a nice little notched opening in the base of the wrist so it will be easier to get the mitts on and off.)
Round 2: Ch 3, DC in every stitch around. Join with a slip stitch.
Rounds 3 - 5: Ch 3, DC in every stitch around. Join with a slip stitch.
Round 6: Ch 3, 2 DC in next DC, DC in each DC around, 2 DC in last DC. Join with a slip stitch.
Round 7: Ch 3, DC around, join with a slip stitch.
Round 8: CH 3, DC in each of the next 2 sts, *Puff st in next st, DC in following st;* Repeat * to * 6 times. DC in each of the remaining sts. Join with a slip stitch.
Round 9: CH 1, sc in each st around. Join with a slip stitch.
Round 10: Slip stitch in each of the first 3 sts, *Puff st in next st, DC in following st;* Repeat * to * 6 times, Dc in each stitch to the last two stitches. Leave last two sts unworked. DO NOT JOIN.
Round 11: Ch 1, TURN. Sc in each dc and puff st around, ch 5 over the slip stitches and skipped stitches, join to the first sc of the round.
Round 12: Ch 3, turn. DC in each of the next 5 sts, *Puff st in next st, DC in following st;* repeat * to * 6 times. DC in each of the remaining sts, join with a slip stitch.
Round 13: Ch 1, sc in each st around, join with a slip stitch.
Round 14: Ch 3, DC in each st around, join with a slip stitch.
Round 15: Ch 1, [Sl st in the next st, ch 1, sl st in the same st] in each st around, join with a slip stitch. Fasten off and weave in loose ends.

Pattern Instructions for Second Mitt
To crochet the second mitt, follow the instructions for Rounds 1 through 7 of the first mitt.
Round 8: CH 3, Dc in next 13 DC sts, *puff st in next st, DC in following st;* repeat from * to * 6 times. Join with slip stitch.
Round 9: Ch 1, sc in each st around. Join with a slip stitch.
Round 10: Slip stitch in the first four sts. DC in each of the next 10 sts. *Puff st in the next st, DC in the following st;* repeat from * to * 6 times. DO NOT JOIN.
Round 11: Ch 1, TURN. Sc in each DC and puff st around, ch 5 over sl sts and skipped sts, join to the first st of the round.
Round 12: CH 3, TURN. DC in each of the 5 ch sts, DC in next 9 DC sts. *Puff st in the next st, DC in the following st;* repeat from * to * 6 times. Attach to top of Ch 3 with a slip st.
Round 13: Ch 1, sc in each st around, join with a slip stitch.
Round 14: CH 3, DC in each st around, join with a slip stitch.
Round 15: Ch 1, [sl st in the next st, ch 1, sl st in the same st] in each st around, join with a slip stitch. Fasten off and weave in loose ends.

As with all of my patterns, please feel free to use this pattern to make any number of items you want. You are more than welcome to sell the finished items; please just do not sell the pattern itself or copy it anywhere else. Thanks!

2012: A Sweater Odyssey

Hahahahaha, I crack myself up. ;)

Anyway, seriously. In 2012 I WILL KNIT A SWEATER!!!!!!

There, I've said it. All bold and stuff, and even with all caps. That means I have to do it!

Sometimes, I need accountability for things. I have wanted to knit myself a sweater for, well, pretty much as long as I've been a knitter. And yet I've never done it! This must be remedied.

This year I'm going to knit a sweater. I'm even going to spin the fiber to make into yarn to knit the sweater! See? I've got the fiber right here:

Those lovely batts will become a 3ply yarn (another first for me, believe it or not) which will become a sweater. Of some kind. I refuse to go too far into pattern browsing until I know the yardage.

Anyway, would you like to join me? Maybe 2012 can be the year YOU knit or crochet a sweater, too! Whether it's your first sweater or your 100th, I'd love for us to share our sweater stitching progress together. I've started a thread in my Ravelry group for just this type of purpose, and there are already several people joining in and planning their sweater projects. Come join us!

There is NO requirement that you use my yarns/fibers to make your sweater. However, I am offering some pretty sweet deals if you choose to do so. For instance:
- Get 16oz of fiber for the price of 12oz
- Get 20oz of fiber for the price of 16oz
- Get 4 skeins of yarn for the price of 3 skeins
- Get 5 skeins of yarn for the price of 4 skeins

I really hope you'll stitch along with us in 2012!

Before you leave, leave me a comment! What are some of YOUR yarn-related goals for the new year?

Wednesday, December 21, 2011

Free Knitting Pattern: Braided Cowl

I published this pattern a while ago, but now I'm moving it to its new forever home on the blog. I hope you enjoy it! I will tell you that it is un-tested and it's written with the assumption that you know a little bit about knitting; in that way it's more of a tutorial than an explicit pattern.

I've been wanting to knit one of these in super bulky yarn; I bet it would make a really fast knit that way if you're looking for a last-minute holiday gift!

Anyway, here's the pattern - enjoy!

Braided Cowl
by Jessica Cook


Pattern Notes and Materials:
This particular cowl looks complicated but is really very simple. It comes with several finishing options and is easily customized using a different stitch pattern or yarn type than specified. Make this project your own in several ways and you'll be hooked on cowls in no time.


Materials Needed:
  • Yarn - I used worsted weight for the sample and it took approximately 185-195 yards. This pattern could be made with any type of yarn but I don't have guarantees on yardage if you change the yarn you use.
  • Knitting needles - I used size US 6 straights; again, if you use a different type of yarn you'll need to go up or down in needle size to make this work.
  • Tape measure
  • 3 stitch holders or scrap yarn
  • 6 stitch markers (optional)
  • Buttons (optional)
Gauge isn't overly important for this pattern, as you're going to use your own gauge to determine the finished product. This cowl is knit flat and seamed together at the end.

Directions:

There are three options for finishing this cowl. The finishing option you choose will determine your cast-on method as well.
- Option 1: Grafting with Kitchener Stitch. For this method, use a provisional cast-on.
- Option 2: Fake grafting or whip stitching. For this method, use any cast-on you like; I used the cabled cast-on.
- Option 3: Button closure. For this method, cast on any way you like; you'll make button holes in the last few rows.

Knit the Cowl:
  1. For any option, you need to cast on a number of stitches that's divisible by three. Your cast-on edge will be the width, or height, of your cowl. For my sample, I cast on 60 stitches. Remember to match your cast-on method to the type of closure you want. If you're using thicker yarn, you'll need fewer cast-on stitches; for thinner yarn you'll need more.
  2. If you plan to make the cowl with a button closure, knit an inch of garter stitch (Knit every stitch of every row) and half an inch of stockinette. If you plan to do grafting or fake grafting, knit all stockinette. For your stockinette rows, knit like this:
    R1: Knit all
    R2: Knit 2, pm (sm in all subsequent repeats), Purl 56, pm (sm), Knit 2
    Repeat R1 and R2 for 1.5 inches. End your stitches on a purl row.
  3. For the next RS row, knit only the first 20 stitches. Put the next 20 stitches on a stitch holder and the final 20 stitches on another stitch holder (or scrap/waste yarn).
  4. Knit back and forth across the first 20 stitches only. Knit the following pattern rows:
    R1: Knit all
    R2: K2, sm, P16, sm, K2.
    Continue knitting until your first strip is approximately 18 inches long, measured from the cast-on edge to the live stitches on your needles. End on a purl row and put these stitches on a stitch holder or scrap yarn and cut your yarn, leaving a 4-inch tail.
  5. Take the center stitches off the stitch holder and put them on your needles. Knit back and forth on these stitches as you did in step four. Repeat this with the third set of stitches as well so that you have three strips of stockinette stitches, all on holders. Do not cut the yarn on the last strip.
  6. If your work has curled up, block the strips individually using steam or water. If not, keep going.
  7. Braid the three sections as you would braid hair. When you finish braiding, thread one knitting needle through all three sets of stitches in order from left to right with the RS facing you.
  8. Knit across all three sets of stitches, mirroring what you did with the setup rows. If you’re using grafting or fake grafting, knit stockinette (repeating R1 and R2) for 1.5 more inches.
  9. If you’re using the buttonhole method, you need to make the holes. So knit your stockinette, then switch to garter stitch and knit for two rows. On the third row make YO or Bind-off/ Cast-on button holes in the garter stitching. Keep garter stitching until your last section measures 1.5 inches total.
  10. Bind off for button holes and fake grafting. Stitch fake grafting together. For Kitchener, follow those instructions to seam the short ends together.
Finishing:
I should say that I have knit this only once myself, and it was a work in progress. For mine, I knit only a one-stitch garter stitch border and it curled a LOT, so the back was actually much wider than the braided front. If yours does this, do what I did and curl the back in on itself and sew a few stitches to even it out. If yours doesn't, then that's a good thing.
To make this cowl your own, try knitting the whole thing in garter, seed, or moss stitch. Put a cable down the center of each section or add a lace pattern. Make each strip longer for a more looped infinity scarf. There are a million ways to change the basic formula to make it suit your needs.

As with all of my patterns, feel free to knit this cowl for any purpose, including selling the finished items. Please feel free to link to this pattern online, but please do not copy the pattern itself and publish it elsewhere or sell the pattern as your own. Thank you!

Monday, December 19, 2011

Handmade Holidays: Love Bots

Two more handmade holiday gifts finished, wahoo!!!

If you're a new reader to the blog, you may not know that I have three children: Will is 8, Jillian is 6 and Zack is 2. This year I'm making at least one handmade gift for each of them.

Will and Zack are getting ...

ROBOTS!!!!!

I sewed these lovable little bots from a sewing pattern by Rebecca Danger. (If you're a knitter you may recognize her name as the creator of all those adorable monster knitting patterns.)

In the pattern, Ms. Danger is honest about the fact that there are some spots in this project that may be tricky. She was right, but even as someone who normally only sews straight lines, I managed to figure it out twice! So I guess that's the mark of a good pattern.

There are a few wonky spots here and there, like an arm that only got 1/2 stuffed or another arm that's a different fabric than the rest of the bot. I like to think this just adds to the charm of the project, LOL.

These little bots are a really nice size, too. They're about 12-14 inches high in the torso alone. I'm too lazy to measure them right now, but here they are for size comparison with one of my husband's DVDs:

No, you can't watch South Park. Naughty robots.

Here's a closeup of their faces and chests. I used an awesome fabric for the hearts that looks like circuitry, and for the eyes I embroidered them on with felt since I didn't have safety eyes that were large enough for my liking.

Two more handmade gifts to go, plus two other custom projects for trades/customers. Back to crafting!!!

Sunday, December 18, 2011

Handmade Holidays: My first "Real" Quilt!

The holidays are upon us! I admit that I'm totally freaking out on the inside, but trying to keep it cool on the inside. Today I'm hoping to finish at least two of my holiday projects; if I succeed I will feel much better at the end of the day, that's for sure.

So, without further ado, I present

Finished Project #1!

I made a quilt for my sister:


Earlier this year, my sister went to the Knit Picks/Connecting Threads warehouse sale and bought me a TON of batik fabric remnants. I took all the purples and greens from that plus a few from my fabric stash to make her this quilt. I used this pattern as a guide, though I only used two colors instead of three so I just made equal numbers of purple and green blocks. In the end the quilt is a good size for snuggling on the couch or taking to a picnic or a stadium. It's not really bed-sized but it was large enough for me to snuggle up underneath it with plenty of room to spare, and that works for me!

I'm off to sew more squares for my dad's quilt now; I'm tying his instead of actually quilting it and it's just a simple patchwork pattern so I'm hoping to finish it within a few days. For today, finished project #2 will hopefully be one of the toys I'm making for my children.

Ok, back to crafting!!!

Friday, December 16, 2011

Fiber Arts Friday: December Phat Fiber Contribution

Happy Fiber Arts Friday, everyone!!! It's almost Christmas, which of course keeps all of us makers busy, doesn't it?

If you're looking for the Sew, Mama, Sew Giveaway post, CLICK HERE! (If you don't know what I'm talking about, check it out - it's an amazing bundle of giveaways, including mine!)

Ok, back to Fiber Arts Friday. Today's post is brought to you by the new colorway I created for the December Phat Fiber Sampler Box:

Dragonriders of Pern!!!!!!!!!


This colorway was inspired by the dragonriders in the late, great Anne McCaffrey's novel series of the same name.

From the Weyr and from the Bowl,
Bronze and brown and blue and green,
Rise the dragonmen of Pern,
Aloft, on wing, seen, then unseen.
(from the Dragonriders of Pern series)
This month the theme for the Phat Fiber boxes is "Childhood Favorites." After the recent death of Anne McCaffrey, I had several customers contact me to tell me that she had been a favorite author during their youth and ask if I would create a colorway (or several) inspired by her works.

This colorway, a combination of bronze, brown, blue and green, is going to be the first in what I hope will be a whole series of Dragonrider colorways available in the Storied Yarns shop. Just give me time to read the rest of the books!

The holidays are approaching! I hope you take time from all the work you're doing to make them special for others to actually do something for yourself. Buy yourself a lovely skein of yarn (gee, if only I knew a fiber artist who was having a HUGE SALE), pour yourself a cup of cocoa (or a cocktail, depending on the type of day it has been and your personal preferences, HA!), give YOURSELF the gift of handmade love. You deserve it.

Merry Christmas, Happy Hanukkah, Blessed Yule, and all the rest!

Now head on over to Andrea's blog and visit the rest of the Fiber Arts Friday participants. :)

Tuesday, December 13, 2011

Infinitely Simple Lace Infinity Scarf: Free Knitting Pattern

NOTE: Pattern has been updated as of June 20, 2012 to address the curling edges issue that lots of knitters were having.

Hi there!

This pattern used to be published elsewhere, but I have re-obtained the full copyrights to it so I'm publishing it here. Use it for personal uses, sell the finished scarves or whatever you like - please just don't sell or copy the pattern itself. Thanks!!

View the Ravelry page for this pattern here.

This is my preferred way to wear it, but you can also loop it more or fewer times.


Materials and Abbreviations

This pattern will work with any combination of yarn and a circular needle, depending on how long or wide you want your infinity scarf to be. For the sample pattern I used a 2ply handspun yarn; it was approximately DK to worsted weight and I had 180 yards. So you can make yours exactly like I did with an equivalent amount of yarn, or go up or down in needle and yarn sizes to customize this project however you like.
I also used a size 10.5 US knitting needle, with a circular cable of about 16-19 inches. Again, you can change this; the important thing here is to use a needle that is a size or two bigger (or more) than what you'd normally use with the yarn you've chosen. This gives it that nice lacy, open look and also helps you knit faster.
You will also need a large eye blunt needle for weaving in the ends of your finished scarf and a stitch marker to keep track of the beginning of your rounds.

The abbreviations used in this pattern are:
K - knit
P - purl
YO - yarn over (increase)
SKP - Slip, Knit, Pass slipped stitch over - slip the first stitch knitwise, knit the next stitch, pass the slipped stitch over the knitted stitch to drop it. (decrease)
K2tog - knit two together (decrease)

This is the yarn I used for the project. A 2ply from a batt by EverImprovingMe.


Directions

Cast on your stitches; you need a multiple of five for the pattern. For my sample, I cast on 180.

Note: The lace pattern in this scarf came from the "Lace ZigZag stitch number 146" from the book Knitting: The Complete Guide, by Jane Davis.

Place a stitch marker between your first and last stitches, join to work in the round and proceed with your knitting!

Round 1: K all stitches.
Round 2: P all stitches.
Round 3: K all stitches.
Round 4: P all stitches.
Round 5: K2, (YO, SKP, k3); repeat ( ) around, ending with k1 instead of k3.
Round 6 and all even rounds of pattern: K all.
Round 7: (K3, YO, SKP); rep ( ) around.
Round 9: K1, (K2tog, YO, K3); rep ( ) around, ending with K2 instead of K3.
Round 11: (K2tog, YO, K3); rep ( ) around.
Repeat rounds 5-12 (round 12 is K all like the other even pattern rounds) to repeat the pattern as many times as you want or until you're almost out of yarn. For my sample I knit this pattern until my zigzags went back and forth about five times. If you have more yarn you can just keep knitting, even if you have to stop early; just make sure to end the pattern on an even-numbered round.

Finishing rounds: (NOTE: The sample in these photos only had 2 border rounds on each end and they curl, so I've added two more to the pattern itself.)
Round 1: K all stitches.
Round 2: P all stitches.
Round 3: K all stitches.
Round 4: P all stitches.
Bind off, block, and weave in ends.

Scarf Style


Long and loose

 
All looped up
 Like this scarf? Join my Ravelry group to be updated any time I publish a new pattern or add yarns to my Etsy shop!

Monday, December 12, 2011

Sew, Mama, Sew! Giveaway Day!

Thanks to everyone who entered! This giveaway is now CLOSED. The winner was ...


Andria said...
I love homespun, and would like to learn to spin and dye myself one day. I like to get the yarn in my hands before I decide what it will be, so I'm not sure just yet what I would make.

Congratulations, Andria! I'm off to e-mail you for details. :)

For everyone else, use code Giveaway to save 10% in my Storied Yarns shop now through the end of the year!

Hi there! Welcome to my little corner of the world! It's the Sew, Mama, Sew! Giveaway Day (week, really) - one of my favorite times of the year! Visit the SMS blog for more fabulous giveaways when you leave here.

My name is Jess, and I make yarn for a living. It's a great life! Give me a minute to introduce myself and show you around; then I've got a lovely skein of yarn to give away.

I'm an indie dyer, which basically just means that I dye yarn and wool in a one-woman operation known as Storied Yarns. You can find me here on the blog, on Etsy, Facebook, Ravelry and Twitter. I hope you'll follow along with me on my many adventures! The best way to do that is to join my Ravelry group or sign up for my newsletter so you can stay up to date on crafty tutorials, giveaways, and coupon codes!

While you're here, I know you're probably just going to enter the giveaway and move on to the other great giveaway posts, and that's totally fine! I hope you'll bookmark this page and come back to it later, though, because I love having visitors! My blog is the place where I post a lot of crafty information, book reviews and more!

Find a list of free knitting patterns I offer on the right-hand sidebar. You'll also see my free crochet patterns and other crafty tutorials.

Today, the item I'm giving away is a skein of handspun yarn; this means that I literally took a bunch of wool and other fibers and I spun them on my spinning wheel (Sleeping Beauty style) to make this yarn. Here it is:


For some of you, knitting with handspun may be a regular occurrence. For those of you who are new to handspun, let me tell you why it's wonderful!

I believe that when you make something with your hands, you tell a story with that item. You carefully choose the yarn and the pattern to work together to make a gift of beauty and utility. I think that knitting with handspun yarn only adds to that story, enriching it with the tale of what the yarn used to be and what it has become. Quite literally, when you make something with this skein of yarn, it will have been made by hand every step of the way (hand dyed, hand carded, hand spun, hand knit/crocheted/woven). Isn't that amazing?!? I think it is.

In case you're new to using handspun, here's a blog post I wrote on my previous blog about the various types of handspun yarn (there are plenty more but it's a good beginning spot). Here's another post I wrote on knitting and crocheting with handspun yarn.

Would YOU like a chance to knit/crochet/weave with this lovely skein?


The Details:
"Flower Ball" handspun 2ply yarn
Colors: pinks, burgundy, light blue, light green
3.3 oz, 196 yards, worsted to bulky weight
Fiber from Jane's Urban Cottage on Etsy

If you would like to enter to win this giveaway, please answer any or all of the following questions in a comment below:
- Have you used handspun yarn before?
- What are your thoughts on using handspun yarn?
- What do you think you might make with this yarn?

Only ONE entry per person, please! I will leave the giveaway post open until 5pm PST on December 16. Please leave your e-mail address in your comment so I can contact you if you win! I will open this contest to anyone in the US or around the world.

Thanks for visiting my blog - I hope you'll come back again soon!

Visit Storied Yarns today for all your yarn and fiber needs - wool and yarn inspired by YOUR favorite characters stitch the best stories!

Monday, December 5, 2011

Handmade Holidays: Garland Kids Can Make!

Yesterday I took my daughter to her Daisy Scout troop meeting, and while I was there I taught her troop members how to finger knit. I used this tutorial from Knitty.com to refresh my own memory on how to do it, practiced with my eldest two kids on Saturday afternoon and on Sunday I had four little 6-year-old girls and their mothers finger knitting along with me!

During the time we spent together each girl made a chain that was at least long enough to wear as a necklace or a bracelet. Some of them chose to keep on knitting away, so they took theirs home with them to make them longer.

I'm not sure if the other girls will continue their finger knitting adventures or not, but my daughter is definitely hooked! She came home and went to town on some red yarn after I told her she could use the resulting finger-knitted chain as holiday garland. Here's what she made:


She used up the entire left-over skein of that particular red yarn, and it only covers about the top 1/3 of our tree. So today she's starting over with a new ball of some left-over red acrylic from my stash (I knew that would come in handy one day!) and she's going to make enough to fill the whole tree with festive garland!

Here's a close-up so you can see the cute little chain:


I think this would be fun to do with handspun, too. It would be great for art yarn necklaces!

Since my daughter loves this so much, I'm thinking of getting her a knitting loom. The process for finger knitting and loom knitting is almost the same thing, so she should be able to pick it up quickly. Maybe she can make hats for babies and donate them to local hospitals!

Thursday, December 1, 2011

Have a Yarny Christmas!

Hello everyone, and Happy December! I'm starting to count down the holidays with my kiddos as of tonight, and I'm super excited for all of our activities this month! We'll be making paper snowflakes, reading holiday stories and of course chugging down plenty of hot chocolate!

There's plenty of yarn here at Storied Yarns Central on any given day, but I try to showcase it during the holidays, too! This year, for me, it's all about yarn garlands. I thought I'd share my yarn decorations with you today to celebrate the first of December. :)

Here's the garland I have hanging near the cornice in my living room:

I'm sorry for the not-so-great lighting; I took this photo this morning when the sun was still shining through that window.

I used the Grandma Twinkle pattern to crochet several red and green stars out of kitchen cotton last year. This year I strung them onto an evergreen garland along with some bead garland we had in our decorating supplies, hung it over the window and voila! Instant yarny decor! :)

I've also got some garland that's made entirely from yarn. I took wool fleece and dyed some of it red and some green, leaving the rest its natural white and grey colors. Then I spun it up into a single with some holiday tinsel and knitted it into an i-cord with a few jingle bells here and there. Now it hangs over the doorway between my dining room and my kitchen like so:


This is the time of the year when I'm glad I know how to crochet. I like to pull out my leftover yarn balls from other projects and hook them into shape as crocheted motifs that become ornaments:


I get my motif patterns out of this book, but you can make up your own, too!

Today is the last day to incorporate a Storied Yarns yarny surprise for yourself or someone you love under the tree - tomorrow I'm taking down the listings for my Small and Large holiday surprise gift boxes! I've got to order a bunch of goodies, load them up and ship them out so I can't keep the listing up after today. Get 'em while you can!! :)

So what about you - what are some of the ways YOU incorporate yarn into your holiday?

Wednesday, November 23, 2011

Black Friday/Cyber Monday Weekend SALE!

Cyber Weekend is here! Shop Storied Yarns for all your fiber arts needs! This weekend, you have TWO amazing ways to save!

First, use the coupon code NUEVO to get FREE SHIPPING worldwide! Put this code in the coupon code box at checkout for automatic savings.

Next, use code THANKSGIVING to get even more savings! Put this code in the Notes to the Seller at checkout to receive:

    10% off fiber/yarn clubs, holiday surprise gift packages, kits, KAL/SAL listings and custom orders.
    20% off in-stock yarn, rovings and batts.
    30% off in-stock handspun yarns.
    FREE Spinning service - you buy my fiber (at 20% off) and I will spin it for you for FREE!

Use the THANKSGIVING code in your notes to seller so you can combine it with the NUEVO code in the coupon box. You can either pay with PayPal at checkout and I will refund the THANKSGIVING discount or choose "Other" as your payment method and I will send you a PayPal invoice that reflects your total including the savings.

Remember, December 1 is the last day to purchase a holiday surprise yarn or fiber package, so get them while you can!!

I will also be including a small gift with every purchase made this weekend - just my way of saying thank you to YOU!

You can use the THANKSGIVING code to save on as much or as little as you want! If you buy one skein of yarn you will save 20%. If you buy a batt and a club to go with it you will save 20% and 10% on those purchases, respectively, too!

THANK YOU for shopping with me. I hope you enjoy your holiday weekend!!

XOXO,
Jess


  [1]: http://storiedyarns.etsy.com

Wednesday, November 16, 2011

What's Cookin'? Oatmeal Breakfast Cookie Recipe

A few years ago, the Quaker Oats company made this amazing concoction: breakfast cookies. They had oatmeal raisin and oatmeal chocolate chip, and they were delish. They don't make them any more (now they have a similar product called Oatmeal to Go or something like that), but that doesn't mean you can't enjoy something similar!

Today I baked up a batch of regular oatmeal cookies for my kids, using the same recipe I always use - it's in my Betty Crocker cookbook. Then I made another batch where I tweaked that recipe and cooked up some breakfast snacks. I figure I can give them to the kids in the morning as an alternative to regular oatmeal or pancakes; they're full of whole grain and protein (and fruit for some of them) and they'll save me some time.

In case you'd like to make them for yourself, here's my basic recipe:

Ingredients:
3/4 cup butter, softened
1 cup packed brown sugar
1 teaspoon baking powder
1/4 teaspoon baking soda
1/2 teaspoon cinnamon
2 eggs
1 teaspoon vanilla
1 3/4 cups all purpose flour
2 cups rolled oats
1/2 cup chopped nuts (baker's choice on the nut variety; mine were mixed)

Directions:
1. In a mixing bowl, beat the butter on medium/high speed with an electric mixer for about 20 seconds. Add in the brown sugar, baking powder, baking soda and cinnamon. Beat until combined.
2. Beat in the eggs and vanilla until combined, then add the flour and continue to beat until you have to stop and use a spoon. Stir in the rolled oats, then stir in the nuts.
3. Drop in heaping tablespoon portions onto a cookie sheet; I can fit 9 to 12 cookies on one of my standard cookie sheets if that helps you with size proportions. Bake at 375 degrees Fahrenheit for about 10-12 minutes or until slightly brown on the edges. Allow to cool.

Alternatives:
- For my cookies, I made half the batch as described above. Then I beat a banana with my mixer in a separate bowl and stirred that in with the rest of the batch and baked a banana version. My daughter, who's 6, pronounces both pretty good but she prefers the banana-free option. This banana version would also be great with some nutmeg thrown in, but we were out.
- I think this would be awesome with chocolate chips, though since it's for an everyday breakfast in our house I left them out.
- My friend Candice suggested adding raisins or dried fruits. If I do that my kids won't eat them, but maybe yours will.
- I considered adding some applesauce or finely chopped/diced apple pieces, too.

Happy baking! If you make these, I'd love to hear your comments and suggestions for improvement. Mine turned out pretty good but I'm definitely NOT a professional baker (just ask my sister, who still laughs at me b/c I didn't know the ingredients for making buttercream icing), so I'm open to ideas! :)

Tuesday, November 8, 2011

Handmade for the Holidays

So, some of my husband's co-workers wanted to know what types of things I can make. Rather than try to send all that in an e-mail I thought I would make it into a blog post. For the rest of you readers who are also crafty, maybe it will help you get ideas for your own handmade holiday gifts as well!

Let's start with knitted/crocheted items.

For gifts, I love hats, cowls and fingerless gloves. They're fast, almost anyone can use them, and you can drastically alter the cost of the project by careful selection of the yarn you use. Here are some of the items I've made in the past:

These are the Lovisa Armwarmers, made in one color instead of doing the colorwork suggested in the pattern. I used handspun I received in a swap, and I wear these things ALLLLLLL the time!

For another simple armwarmer pattern that looks great in handspun, I love Toast and Toasty!

For a budget-friendly, masculine option, I made these mitts for my dad out of a wool/acrylic blend chunky yarn:


The pattern for these is Scrummy mitts. I also made a hat for him that matches:

Another super simple pattern, the Brangelina hat!

A few more hats I've made recently -

This one I made out of handspun 2ply Polwarth. It was a real dream to knit!


This pattern is the Lotus Hat and it's probably better suited for solid colored yarns but I still like how the texture shows through the colors I used.

I also crocheted this lacy beret for a swap partner using my own hand dyed sock yarn:


The pattern for that one is The Columbia Beret and I like how it's lightweight and feminine, which works well down here in the South where we don't always need a super warm, bulky hat.

How about those cowls? I love cowls because you can make them long and loopy or short and close-fitting. Either way they look great and they're a fabulous addition to any winter wardrobe. Here are a few of my favorites:

I made this one for my sister last Christmas from some silvery handspun. I love how you can loop it up to three times and it's lacy but also warm:


The pattern is my own design - the Infinitely Simple Lace Infinity Scarf pattern.

Here is one I knit up using some handspun that I got in a swap. I just did a garter stitch border and stockinette for the middle section, so there's no real pattern. For extra warmth you can wrap it up around your head or loop it twice around your neck and head area.


I can also make baby items! Baby items are great for any time of the year; they're always being born, after all!

Here are a few baby items I have knit - I especially love hats and blankets because every baby needs plenty of those.

This one is the Big Wool, Little Hat that I knit for my son a little over a year ago. I love the pointy top and the braided tassels!

I made one of these Beth's Little Star Afghan blankets for each of my children -

I also made one for a friend's baby using the colors of her family's favorite football team. That one was a hit!

In addition to hand-knits, I also like to sew gifts for people. I made this blanket for my sister to give to her friend (the baby's last name is Martini, so you don't have to be too disturbed by the fabric choice, ha!):

I also love to sew toys. I made this pink dinosaur (with a bad boy's heart, LOL!) for my son, whose favorite color is pink!


And I made these patchwork pillows to match the futon in my kids' play room:


There's really no limit to handmade gifts if you just use a little creative thought and put in the time. I'm happy to take custom order requests for any handmade (knit, crochet, sew, quilt) gifts for your loved ones this holiday season or any time! Just leave me a comment on this post and I'll get back to you!

Monday, November 7, 2011

Happy Holidays to YOU!

I've added a few holiday listings to the Storied Yarns shop!


Do you want to be sure you'll get something you really love this holiday season? Buy yourself a fibery surprise package! Choose either the small surprise box or the large surprise box and I will send you full-sized yarn or fiber offerings PLUS extra goodies - everything from handmade products from Etsy to items from my local gift shops and even edible treats! I will send you a survey after purchase to be sure you get a box full of GOOD surprises you're sure to enjoy!

Also, if you want to send this as a hint for someone you love who will be shopping for YOU this holiday season, sign up for my newsletter! I will be sending out information about these packages in the next issue (coming out at the end of this week, so sign up now!) and you can forward it to your loved ones!

Sunday, November 6, 2011

Drive-By Book Review: Incarceron and Sapphique by Catherine Fisher

My friend Steph recently sent me a box full of books to read (a great little swap we've arranged between the two of us), and in it was Incarceron by Catherine Fisher. I devoured that one pretty quickly so she brought me the sequel the next time she saw me - Sapphique.

If you know my reading preferences at all, you won't be remotely surprised that I was instantly intrigued by the premise of Incarceron - it's a Young Adult novel set in a dystopian future. In other words, it's right up my alley!


With Incarceron, Catherine Fisher grabs you right from the start and sucks you into her story and her characters. Immediately you meet Finn, a prisoner; eventually the story unfolds to reveal what's going on in Finn's world and Outside the prison.

Essentially, Incarceron is set in a fictional future where we have destroyed our planet with war. As a solution to this a king has created a system where everyone lives in a sort of historical re-enactment. Trapped by the protocol of the past the people are left without sufficient technology and freedom, therefore they aren't able to destroy the earth or each other again.

Oh, and as an added bonus, they stuck all the criminals in a living, breathing prison known as Incarceron. Built to be a Utopia where all the undesirables of society can start over and rebuild their lives, Incarceron is instead a Hell for its inhabitants. It is full of mysteries and monsters and humans with darkness inside their hearts. Finn is trapped in this world, but somehow he senses it isn't where he belongs.

Anyway, eventually Finn contacts Claudia, a girl who lives Outside as the daughter of Incarceron's Warden. Together they form a plan to free Finn from Incarceron and overthrow the dictatorial leadership of the Realm where Claudia lives. But, of course, they also unleash an awful lot of chaos and danger.


Sapphique finishes the story, revealing what happens to Finn and Claudia as they find themselves holding onto way more than they can handle in terms of plot twists. In Sapphique we learn more about the history of Incarceron and the Realm and the people who made it what it is. We also learn that nothing is as it seems, Inside or Out.

I'd give this series 3 out of 4 stars. It was very compelling in the first novel, slightly less so in the second but it still kept me turning pages, wanting to know what would happen in the end. I will say, too, that I never would have predicted how it turned out, and that's always a good thing!

Friday, November 4, 2011

Fiber Arts Friday: Spinning Locks!

As part of my offerings at the fiber festival, I sold hand dyed merino locks. A few customers asked me if they had to be carded or if you can spin them straight out of the bag. Of course you CAN card locks or fleece before spinning, but my preferred method is to spin straight from the locks.

Here's why:
1. Spinning from fleece is cheap and fast. You can just grab the fleece (clean or dirty, technically, though I prefer to spin clean wool so as to avoid dirt in my lap) and start spinning. You don't have to pay for all the extra fiber preparation steps and you don't have to wait to do those steps either. Instant gratification at its best!
2. Spinning locks sort of forces you to relinquish control. This can be especially fun once in a while for spinners who like to force the yarn into submission or who stress out when a yarn doesn't turn out the way it was "supposed to." Spinning locks/fleece is like controlled chaos, and you pretty much have to let the locks be in charge, which can be fun (I swear)!
3. Spinning locks gives you instant texture. I love to corespin locks, but they look equally well as singles, tail-spun or a plied yarn. It's so much fun, and it gives you the chunky funky texture of a commercial "fun fur" yarn but without all the plastic. Bonus!

So I thought I'd do a little post today about spinning locks. It's also kind of a lesson in learning from the fiber while you spin and also in how to improvise to create art yarn when you can't afford the wheel of your dreams, so stay tuned! It's a good one. :)

This time I started off with some hand dyed (by me) merino locks and some hand dyed Wensleydale locks that I got as a gift. I tossed the two fiber groups together, like tossing a salad, and I held it in my lap as I spun. Here's what it looked like at that point:


Super fun, right?!?!?

Anyway, as I spun the singles I just grabbed a handful at a time, drafting slightly but still retaining that lock formation and shape as I went. I tried to grab handfuls of each fiber type in proportionate amounts as I spun. Here's a close-up of the singles as I spun them:


You can see here how much I drafted and how the curly locks are still taking center stage, so to speak.

Here's the part where I learned a lesson. I started spinning these singles and I realized that since merino has something of a short staple, it's hard to hold the locks together as a strong single-ply yarn. I started wishing I would have corespun the yarn, but at this point I had already spun so much that I didn't want to waste what I'd used so far, so I kept going. At times the singles broke, either during the merino sections or as I joined merino to Wensleydale, so I ended up having to wind it back out the orifice and re-join in several spots.

As I considered knitting with this yarn, I figured the singles would break in that process, too, and that's just no good. So I figured I'd better ply them to make them more sturdy. The problem with that is that my wheel has a standard orifice, flyer and bobbin. As you can see in the last photo, those locks were barely fitting onto my darling Babe as singles; they were never going to fit through there once I plied them.

What was an art yarnista to do, without an art yarn friendly wheel at her service?

Well, this art yarnista went out to the laundry room where she keeps the Storied Yarns shop inventory. She grabbed her Rule of Thirds spindle and took it for a test spin (product testing is very important, after all!). She loaded that puppy up with a super bulky, 2ply locks-only yarn until it looked like this:


That's almost 3 ounces of super bulky 2ply locks on ONE spindle! Pretty awesome, eh? So, lesson learned: as I save up to buy my dream wheel, I can at least still make art yarns on a heavy spindle. Handy!

Here's the finished skein - sorry the photo is a little dark, I took this picture in the wee hours of the morning:


Pretty awesome, huh? I got about 25 yards of super duper bulky texture out of this little exercise, and it's super soft and gorgeous!!! I'll be putting this baby in the shop soon, but if it doesn't sell my sister might get a new scarf for her birthday out of it. :)

Happy Fiber Arts Friday!! Head on over to Andrea's blog and join in on the fun!

Monday, October 31, 2011

Fiber Festival Recap

My first-ever fiber festival - Fiber in the Boro - went really well! I'm very pleased with my sales and also it was a big bunch of fun to meet so many local and semi-local fibery friends!!

Here's a shot of my booth:


Since not ALL of my fibery friends could attend the festival, I'm also hosting a little "Virtual Fiber Festival" in my Ravelry group! Come on over and check out what I have left of my inventory. Everything is on SALE and I'm also offering FREE shipping (worldwide!) of all the items until I put them back in my Etsy shop later this week. Also, anyone who makes a purchase from the virtual festival can enter to WIN a door prize (I will select it based on the winner's tastes)!

Happy Halloween!!!!


Friday, October 28, 2011

Fiber Arts Friday: Blogs I Love

So, all of my fiber arts stuff is packed up in suitcases right now in preparation to travel with me to Fiber in the Boro tomorrow. I'm vending at my first-ever fiber festival, wahoo!!

Since I don't have anything fiber artsy to show you, I thought I'd take a minute to share some blog love today instead.

I read a lot of blogs. I find it really inspiring to read blogs about what other people are crafting. I've discovered in the past few years that you can learn how to do virtually anything if you Google it, and blogs are a great resource for tutorials, patterns and general crafty inspiration. Here are some of the crafty blogs I love and why:

- Sew, Mama, Sew!
This blog is full of sewing inspiration, as the name implies. Right now I'm participating in a holiday decor sew-along through this blog, where I'm horribly behind in making a table runner and a Christmas tree skirt. I'm hoping to get back on track with those projects after the festival. In addition to sew-alongs, the SMS blog features links to sewing patterns and tutorials as well as a wealth of in-house tutorials and guest posts. It's a really great blog for beginning to advanced seamstresses.


- Pink Chalk Fabric Studio
I first discovered this blog because of Fat Quarter Tuesday; every Tuesday the ladies at the studio put together two sets of fat quarters and give them away, which is pretty awesome, right?!? They also do sew-alongs; right now they're sewing through all of the projects in One-Yard Wonders, which is great for me because I own that book so it can be really helpful to see a more experienced seamstress tackle the projects before I try them. There are also tutorials and posts about new fabric trends and patterns, which I love.


- Made (aka Dana Made It)
This blog is full of great tutorials, too, especially ones for kids' clothing and projects. I really love the clean look of the blog and even though I've only been reading it for a little while, I really enjoy it.

- I Still Love You
This is another mostly new blog for me, but I really enjoy the crafty tips and tutorials. She includes great refashion/upcycled fashion projects, too, which is something that's right up my alley.


- What I Made
Um, wow. This guy is amazing. I mostly don't try to re-create his projects because they seem really complicated, though I know usually they're not. I just love to see what he comes up with, because it's always really individual and amazing.

- Prudent Baby
I love Jaime and Jacinda over at Prudent Baby! They're two moms who admit that sometimes life feels like a hot mess, but that doesn't mean you have to LOOK like it! They have great tutorials for sewing projects and patterns, kids' crafts, gift ideas, recipes and more. They link to other amazing blogs and projects and they really connect well with today's modern mommies.

- Wee Essentials
This blog is owned by Candice, the owner of Wee Essentials and also my friend. She has some great information about eco-friendly living, taking care of your home/family and green products.

As for fiber arts blogs, here are a few I enjoy:

- Liberty's Yarn
I first "met" Liberty through Twitter, where she posted a call to fiber artists to join her for a series of interviews. I enjoyed my interview with her immensely, and if you're a regular visitor here then you know I interviewed her as well. This week she interviewed our very own Andrea of Wonder Why Alpacas, so that was awesome! I also love following Liberty on Twitter because she posts some really awesome and helpful links for crafty business owners.


- Who Needs Gauge
This blog belongs to my friend Steph, who comes up with really creative and fun projects for her kids. The posts she creates aren't exclusively related to fiber arts but it fits in well with her title and she does post plenty of things about knitting, too!

- Adventures in Wool
This is the blog of Johanna, aka Ever Improving Me on Etsy/Artfire/Ravelry. Johanna posts her shop updates here and other information that can be helpful for fiber artists!

- KnitFiber
This is my friend Carrie, who uses her blog to showcase her great fiber arts projects.


- Wonder Why Alpaca Farm
Of course! Our fearless Fiber Arts Friday leader always has something fun and interesting to share with us, doesn't she? I'm so glad I found Fiber Arts Friday and Andrea's blog, because I really enjoy sharing her creative journey through the blog.

I feel like I should have more fiber arts-related blogs that I read regularly. If you have a fiber arts blog or a favorite blog you read, please leave me a comment so I can come and visit! I regularly visit the other FAF contributors but I don't often remember to check their blogs the other days of the week. Leave me a comment to tell me why I should make a note of that! :)

When you're finished, head on over to Andrea's place and link up with the rest of the Fiber Arts Friday fun!

Thursday, October 27, 2011

Gift Ideas for Book Lovers: Five Hot Tips

Searching for the perfect gift for the book lover in your life? Look no further! Whether your bookish friend is a fan of mystery, science fiction, or literary classics, you can put together an amazing gift that is sure to please. Order your gift online or put it together from locally available items; gifts for book lovers come in as many varieties as there are literary genres. Whether you want a serious, cherished gift or a fun and whimsical option, you're sure to find one here that fits your style AND your budget.

1. Boxed Set
If your book-loving friend has a favorite author, consider purchasing a boxed set of books from that author. A boxed set will contain books in high quality hardback editions; that way, your friend can have a full matched set of his favorite books to display on his book shelf. Try the Harry Potter Boxed Set, available from amazon.com for $122.85. Fans of mystery might enjoy a Sherlock Holmes Boxed Set for just over $38.

2. Books and Movies
Buy your book lover the book and DVD version of her favorite story, then put it together with some microwave popcorn and movie theater style boxed candies. Add a 20-ounce bottle of soda and a memento from the movie, such as a movie poster or movie t-shirt, and your gift is ready to give.

3. Wear Your Book On Your Sleeve
Visit Cafepress.com to see a selection of tshirts, bags, coffee mugs, and other printable items inspired by favorite books. Check out this Shakespeare Insults T-shirt for $28 or this Mark Twain Rectangle Magnet for $5. If you don't see something inspired by your friend's favorite book or author, you can create your own custom items using quotes and graphics of your own choosing.

4. Boxes and Baskets
Try this selection of book lover's gift baskets, which include a variety of snacks and an option to choose a paperback novel for inclusion with the package. Or check out this Book Lovers Gift Basket for $44.50; it includes an option to add a Barnes & Noble gift card for an additional price, and comes in a book end chest for a reusable packaging option. You can always put together your own basket, too - include a signed or first-edition copy of a favorite book along with foods inspired by that book (Harry Potter candies and pumpkin juice, for instance).

5. Handmade Marketplace
Etsy.com offers gifts for book lovers in mass quantities. Try these colorful author matchbook notebooks for $6.50 or this custom made charm bracelet for $21.99. Don't forget to browse Etsy's selection of handmade bookmarks while you're there. (Of course, there's always yarn and spinning fiber for book lovers, too!) If you haven't found anything you like yet, contact one of your favorite Etsy artisans and ask for a custom order option. Now that's a one-of-a-kind gift!

Whatever you choose, make your gift memorable by personalizing it for the book lover in your life.

Tuesday, October 25, 2011

Free Crochet Pattern: Sock Yarn Goddess

I first created this little goddess some time last year for the Phat Fiber Sampler box recipients. It worked well with our theme of the elements at the time.

I wrote this originally as a pendant or key chain. I also think it would be a nice gift for a woman you know, to thank her for sharing her inner goddess with the world. I'm thinking of making several out of my own sock yarns and using it as a garland to display my colorways!

Now I'm offering her up for free to all of you, my lovely blog readers! Here we go ...


Materials:
- Approx. 15 yds fingering/sock yarn   
- Crochet hook, size US F (3.75 mm)
- Jump ring or plain stitch marker   
- Large eye blunt needle
- Liquid starch

NOTE: All stitches and abbreviations are in US terminology.

Directions:
Start by making a magic circle or whatever method you use to crochet in the round.  

Round 1: Make 8 sc stitches in the circle, and join with a sl st.
Round 2: Ch 1, 2 sc in 1st stitch and every stitch around. Join with a sl st. (16 sc)
Round 3: Ch 1, TURN, make 1 sc stitch in the next 2 sc stitches. (2 sc)
From here on out you will work back and forth in rows.
Row 4
: Ch 1, turn, make 2 sc in each sc across. (4 sc)
Row 5: Ch 3 (counts as dc), turn, 1 dc in 1st sc, 1 dc in each of next 2 sc, 2 dc in last sc. (6 dc)
Row 6: Ch 3 (counts as dc), turn, 1 dc in each stitch across. (6 dc)
Row 7: Ch 1, turn, sc2tog, sc in each of next 2 dc, sc2tog. (4 sc)
Row 8: Ch 1, turn, sc2tog, sc2tog. (2 sc)
Row 9: Ch 1, turn, hdc2tog. (1 hdc)
Row 10: Ch 1, turn, sc around edge of body up toward the head. When you reach the upper portion of the body, approximately row 5, ch 15. Sl st in 2nd ch from hook and each ch after that and reconnect to the body with a sc. Continue to sc around neck and head, then make 15 ch on the other side of the body to parallel the first arm. Sl st down these sts and join to the body with a sc. Sc around to the bottom of the body. Make 1 dc stitch in the bottom of the body, then sc up this stitch and join with a sl st to a single crochet on the other side where you started the edging. Finish off and weave in your ends.


Finishing:
Bring the goddess’s arms up over her head as if she is clapping. Hold the jump ring between her hands and use needle and spare length of the yarn to stitch the two hands together with the jump ring in between. You will hang a ribbon or chain from this jump ring for wearing. Weave in ends, dip in liquid starch, and block. Let dry and hang her on a ribbon or chain to wear.