Enjoy!
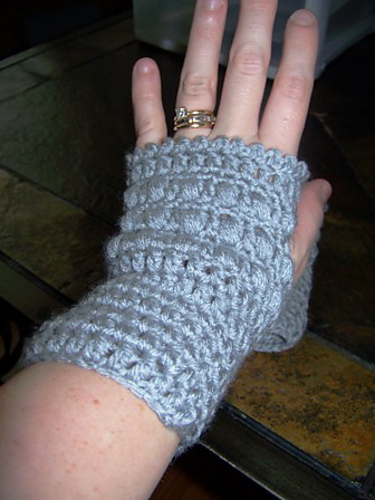
Puff Stitch Wristwarmers
by Jessica Cook
Pattern Inspiration
Last year I crocheted a slouchy hat pattern as a gift for my son's teacher. I wanted to round out the gift a little more, so I whipped up a set of wristwarmers to coordinate with the puff stitch pattern in the hat. This pattern is the result of that moment of inspiration.
I should warn you of a few things before you jump right on into crocheting this pattern:
Here's what I used to make these mitts for myself:
Some notes about the pattern:
I should warn you of a few things before you jump right on into crocheting this pattern:
- I am not a professional crochet designer, though I like to think my patterns are easy to understand. If you have any trouble with this pattern you can PLEASE send me a message here or on Ravelry.com (I'm Jessecreations there).
- I wrote this pattern based on the single pair of these mitts I have made. I made them to fit my hands, which I think are pretty average, but they may not fit your hands. If you find that you crochet the first few rows and these are too big or too small, you may have to adjust the pattern to suit your needs.
- This pattern is untested. Crochet at your own risk.
Materials, Notes and Abbreviations
Here's what I used to make these mitts for myself:
- Worsted weight yarn. It was Hobby Lobby's "I Love This Yarn!" in a solid light grey color. This is close to an Aran weight, really. Feel free to substitute other yarns, just know that it might change the pattern slightly.
- Crochet hook, size US H.
- Large eye blunt needle for weaving in ends.
Some notes about the pattern:
- When you get to round 10, you will start working the thumb hole. You leave a few sts unworked and turn your work instead of crocheting in the round. Then you will re-join your work later, creating a small gap for your thumb.
- CH = chain
- Sts = stitches
- DC = double crochet (American terminology)
- SC = single crochet (American terminology)
- Sl st = slip stitch
- Puff st = (YO, insert hook in next st, YO, pull up a loop) 4 times, YO, and draw through all loops on hook.
Pattern Instructions for First Mitt
This pattern contains directions for crocheting each mitt separately, so please pay attention to that. You will need to know how to crochet in the round in order to make this pattern work for you.
Using your H hook and your worsted/aran weight yarn:
Ch 26.
Round 1: DC in 4th ch from the hook and each ch across. Join with a slip stitch. (Note: This makes a nice little notched opening in the base of the wrist so it will be easier to get the mitts on and off.)
Round 2: Ch 3, DC in every stitch around. Join with a slip stitch.
Rounds 3 - 5: Ch 3, DC in every stitch around. Join with a slip stitch.
Round 6: Ch 3, 2 DC in next DC, DC in each DC around, 2 DC in last DC. Join with a slip stitch.
Round 7: Ch 3, DC around, join with a slip stitch.
Round 8: CH 3, DC in each of the next 2 sts, *Puff st in next st, DC in following st;* Repeat * to * 6 times. DC in each of the remaining sts. Join with a slip stitch.
Round 9: CH 1, sc in each st around. Join with a slip stitch.
Round 10: Slip stitch in each of the first 3 sts, *Puff st in next st, DC in following st;* Repeat * to * 6 times, Dc in each stitch to the last two stitches. Leave last two sts unworked. DO NOT JOIN.
Round 11: Ch 1, TURN. Sc in each dc and puff st around, ch 5 over the slip stitches and skipped stitches, join to the first sc of the round.
Round 12: Ch 3, turn. DC in each of the next 5 sts, *Puff st in next st, DC in following st;* repeat * to * 6 times. DC in each of the remaining sts, join with a slip stitch.
Round 13: Ch 1, sc in each st around, join with a slip stitch.
Round 14: Ch 3, DC in each st around, join with a slip stitch.
Round 15: Ch 1, [Sl st in the next st, ch 1, sl st in the same st] in each st around, join with a slip stitch. Fasten off and weave in loose ends.
Pattern Instructions for Second Mitt
To crochet the second mitt, follow the instructions for Rounds 1 through 7 of the first mitt.
Round 8: CH 3, Dc in next 13 DC sts, *puff st in next st, DC in following st;* repeat from * to * 6 times. Join with slip stitch.
Round 9: Ch 1, sc in each st around. Join with a slip stitch.
Round 10: Slip stitch in the first four sts. DC in each of the next 10 sts. *Puff st in the next st, DC in the following st;* repeat from * to * 6 times. DO NOT JOIN.
Round 11: Ch 1, TURN. Sc in each DC and puff st around, ch 5 over sl sts and skipped sts, join to the first st of the round.
Round 12: CH 3, TURN. DC in each of the 5 ch sts, DC in next 9 DC sts. *Puff st in the next st, DC in the following st;* repeat from * to * 6 times. Attach to top of Ch 3 with a slip st.
Round 13: Ch 1, sc in each st around, join with a slip stitch.
Round 14: CH 3, DC in each st around, join with a slip stitch.
Round 15: Ch 1, [sl st in the next st, ch 1, sl st in the same st] in each st around, join with a slip stitch. Fasten off and weave in loose ends.
As with all of my patterns, please feel free to use this pattern to make any number of items you want. You are more than welcome to sell the finished items; please just do not sell the pattern itself or copy it anywhere else. Thanks!
No comments:
Post a Comment